A potentiometer is a type of variable (adjustable) resistor. Potentiometers are widely used to control the output of electrical devices (e.g. volume of a radio or amplifier, speed of a toy or tool, lighting levels, etc.). Its main function is to resist or reduce electric current. In this passage, we are going to show you how to test a potentiometer step by step.
Tools Needed to Test a Potentiometer
Testing a potentiometer can be useful to ensure that it is functioning correctly and within expected parameters. To effectively test a potentiometer, you may need the following tools:
-
Multimeter: A multimeter is a versatile tool that can measure various electrical properties such as resistance, voltage, and continuity. To test a potentiometer, you can use the resistance (ohms) setting on the multimeter.
-
Alligator Clips or Test Probes: Alligator clips or test probes are used to make electrical connections with the terminals of the potentiometer and the multimeter. They allow for secure and stable connections during testing.
-
Screwdriver: A screwdriver may be needed to access the potentiometer terminals if they are located inside a device or enclosure. It can be used to open up the device if necessary to access the potentiometer.
-
Documentation: If you know the expected resistance values or other specifications of the potentiometer you're testing, having the documentation handy can help you compare the measured values during testing.
-
Pen and Paper or Digital Device: Having a way to record the measurements and any observations during testing can be handy for reference later on.
Here's a general outline of how you can test a potentiometer using a multimeter:
- Set the multimeter to the resistance (ohms) function.
- Disconnect the potentiometer from any power source or circuit.
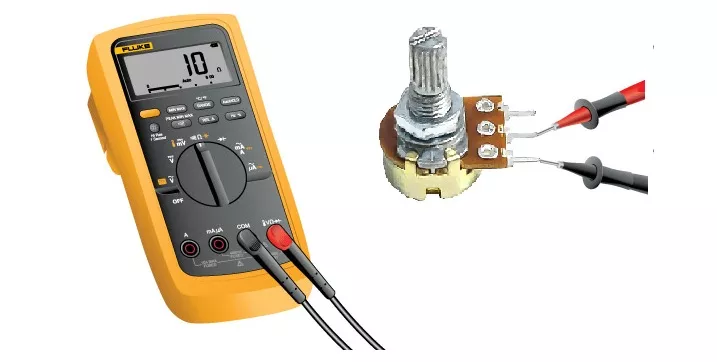
- Connect one probe of the multimeter to one end of the potentiometer and the other probe to the middle terminal.
- Rotate the potentiometer knob across its full range and observe the resistance values on the multimeter. The resistance should change smoothly and consistently as you move the knob.
- Test the other end terminal of the potentiometer in the same way.
- If the resistance values are within the expected range and change smoothly as you adjust the potentiometer knob, the potentiometer is likely functioning correctly.
By using these tools and following the outlined steps, you can effectively test a potentiometer to ensure its proper functionality.

How to Test a Potentiometer in 5 Steps
Testing a potentiometer is a straightforward process that involves measuring its resistance across different points on the device. Here are five steps to guide you through the process:
-
Prepare the Multimeter:
- Set the multimeter to the resistance (ohms) measurement mode. Make sure the multimeter is functioning properly before proceeding.
-
Disconnect the Potentiometer:
- Ensure that the potentiometer is disconnected from any power source or circuit to prevent interference or damage during testing.
-
Identify the Potentiometer Terminals:
- Identify the three terminals of the potentiometer:
- Terminal 1 (one end)
- Terminal 2 (wiper or middle terminal)
- Terminal 3 (other end)
- Identify the three terminals of the potentiometer:
-
Test the Potentiometer:
- Place one probe of the multimeter on Terminal 1 and the other probe on Terminal 2. Record the resistance reading displayed on the multimeter.
- Next, move one probe to Terminal 3 while keeping the other probe on Terminal 2. Record the resistance reading in this configuration.
- Finally, test the resistance between Terminal 1 and Terminal 3 by placing a probe on each terminal and recording the resistance reading.
-
Analyze the Readings:
- Compare the resistance readings obtained in the previous steps to the specifications of the potentiometer, if known.
- Check for consistent and smooth resistance changes as you move the potentiometer knob. Any significant inconsistencies or irregularities may indicate a faulty potentiometer.
By following these five steps, you can effectively test a potentiometer using a multimeter and gain insights into its functionality and condition.
[Must Know] Notes on How to Test a Potentiometer
When testing a potentiometer, it's important to be mindful of certain key considerations to ensure accurate results and effectively evaluate the component. Here are some essential notes to keep in mind when testing a potentiometer:
-
Disconnect Power: Always disconnect the potentiometer from any power source or circuit before testing to prevent electrical hazards and ensure safety.
-
Use a Multimeter: A multimeter is the go-to tool for testing a potentiometer. Set the multimeter to the resistance (ohms) mode for accurate measurements.
-
Identify Potentiometer Terminals: Potentiometers typically have three terminals: one end terminal (Terminal 1), a wiper or middle terminal (Terminal 2), and the other end terminal (Terminal 3).
-
Check Resistance Value: Refer to the potentiometer's datasheet or specifications, if available, to understand the expected resistance range. This will help you assess if the potentiometer is functioning within the desired parameters.
-
Smooth Resistance Transition: Rotate the potentiometer knob slowly and steadily while measuring resistance between the terminals. The resistance should change smoothly without sudden jumps or fluctuations.
-
Measure Across Terminals: Test resistance between all possible pairs of terminals (1-2, 2-3, 1-3) to get a comprehensive view of the potentiometer's performance.
-
Observe Readings: Note down the resistance readings for each terminal pair and ensure they align with the expected values. Any significant deviations may indicate a faulty potentiometer.
-
Physical Inspection: Visually inspect the potentiometer for any visible damage, corrosion, or signs of wear that may affect its performance. Ensure all connections are secure.
-
Replace if Necessary: If the potentiometer exhibits inconsistent readings, erratic behavior, or is outside the expected resistance range, consider replacing it with a new one to maintain the functionality of the circuit.
-
Document Findings: Keep a record of the measurements, observations, and any anomalies detected during testing. This documentation can be useful for troubleshooting and future reference.
By adhering to these notes and best practices, you can effectively test a potentiometer, identify any issues affecting its performance, and make informed decisions regarding its usability in electronic circuits or devices.
How to Know If a Potentiometer is Bad
Identifying whether a potentiometer is faulty or "bad" involves observing certain signs and performing tests to assess its condition accurately. Here are some indicators that can help you determine if a potentiometer is malfunctioning:
-
Erratic Behavior: If the potentiometer produces inconsistent or erratic output, such as sudden jumps in resistance values or non-linear changes when the knob is turned, it could indicate a faulty potentiometer.
-
Dead Spot: A dead spot on the potentiometer refers to a position where there is no change in resistance when the knob is turned. This lack of response can signal a problem with the potentiometer.
-
Scratchy Sound or Feel: When rotating the potentiometer knob, if you hear scratchy noises or feel uneven resistance changes, it may suggest that the potentiometer is worn out or dirty inside.
-
Fluctuating Readings: If the resistance readings fluctuate or vary significantly even when the knob is kept steady, it could be a sign of internal damage or wear within the potentiometer.
-
Stuck or Loose Feel: A potentiometer knob that feels stuck, loose, or wobbly when turned can indicate mechanical issues within the potentiometer, affecting its functionality.
-
Physical Damage: Visual inspection can reveal physical damage to the potentiometer, such as broken terminals, cracked casing, or signs of overheating. These issues can impair its performance.
-
Burning Smell: If you detect a burning or unusual smell emanating from the potentiometer during operation, it could indicate overheating or internal electrical problems that render it faulty.
-
Inconsistent Output: When testing the potentiometer with a multimeter, if the resistance values do not change smoothly as the knob is turned or deviate significantly from the expected range, it suggests a malfunctioning potentiometer.
-
Short Circuits or Open Circuits: A potentiometer that exhibits a complete loss of continuity (open circuit) or shows a constant low resistance (short circuit) across its terminals indicates a serious fault.
-
Intermittent Operation: If the potentiometer works intermittently or loses connection while being used, it likely has internal contact issues that impair its reliability.
By recognizing these signs and symptoms, you can effectively diagnose a faulty potentiometer. If you suspect that a potentiometer is bad based on these indicators, it is advisable to replace the component to ensure optimal performance in your electronic circuits or devices.